オンボード・グロープラグヒート製作(On-board glow plug heat circuit)⑤DIY PCB
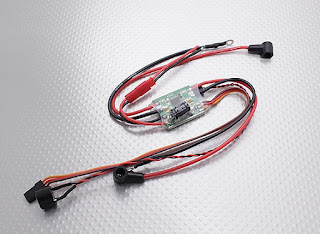
I made DIY-PCB version of on-board glow heater for TWIN engine upon request from my club members. It works good on their SAITO twin glow engine. (Completed 2020/10) The program is very simple and you can turn on/off heater from Tx toggle SW.
I will share my design and this is free for personal use, NOT commercial use.
新たにクラブメンバーよりリクエストがあったので、PCB起こしてみました。(2020/10完成)2人のクラブメンバーのTwinエンジンで順調に機能しています。
PCB layout & schematic(Autodesk Eagle 9.6.2; you can download free version)
PIC 12F675 (or midrange 8pin) program (CCS C-Compiler 5.080)

The schematic. FB1/FB2 goes to FB pin of XL4005 DC-DC converter chip ( that is not written on the schematic)
回路図のFB1/2はDC-DCコンバータXL4005のFBピンに接続

PCB layout プリント基板のレイアウト

Press-n-Peel printed by CANON LBP6040.
「Press-n-Peel」ブルーシート、レーザープリンタで印刷します。
今回使用したプリンターは引退したHP4050に代わり、CANON LPB6040

Polish copper board with #2000 water proof sandpaper.
2000番の耐水ペーパーで表面を磨きます。

Laminator, passing copper board 7 times in highest temp.
アイリスオーヤマのラミネータ。最高温度で7回通せば完璧な転写。

Perfect(?) transferred the image
こんな感じでパターンが転写されます。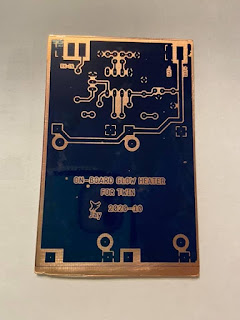
small transfer errors can be fixed by painting by sharpie.
GNDのベタに少し転写不良がありますが、油性ペンで補修すればOKです。
Press-n-Peelはアメリカで10年以上前に買ったものがまだ沢山残ってます。

Etched using Edinburgh etching solution
エジンバラ液(第二酸化鉄にクエン酸加えたもの)でエッチング
Clean toner form the copper surface using acetone.
エッチング後はアセトンでトナーをふき取ります。

Drill with Dremel and Drill stand.
ドリルで穴あけ。穴あけを忘れてたところがある!

Dremel+スタンド。

check connection with Connecting 2s-lipo (7.4V) No PIC attached.
Lipo2セル(7.4V)を接続して導通チェックと出力電圧設定。まだPICマイコンはつけていません。
Two DC-DC board on my PCB, connected Feedback pin of XL4005.

Just toggle TX sw and turn on/off heater.


コメント